Challenge B: Videos
Challenge B: Videos
October 8, 2025
Isaac Clements, Emily Morrow, Hanna White
Understand
Describe the challenge
The purpose of the videos is to teach a range of learners about different hands-on STEAM (Science, Technology, Engineering, Art, and Mathematics) challenges in a fun and engaging way that helps them develop an interest in science.
Context and audience
The focus audience for the videos are elementary and middle school students in grades 2-8 (aged 7-14). In extreme cases these videos could be adapted to fit high school or university students as they explore the complexities of science. Students in elementary school have short attention spans; therefore, the short form videos are perfect for teaching content while maintaining their concentration. Looking at various resources, the consensus is that students’ attention spans are equivalent to two to five minutes plus their age. For example, a student in grade 2 is seven or eight years old, so their attention spans will typically be between 9-14 minutes.
For elementary and middle school students, their needs are to be able to understand content in a clear step-by-step manner that is easy to follow and replicate. The goals for the videos are to give students a “how-to” description of different scientific processes through STEAM. Through this style of content, motivation derives from students’ intrigue towards hands-on learning and the ability to see quick progress and results.
Demographic
Modern elementary and middle school classrooms are highly diverse with many English Language Learners (ELL). Although the videos contain spoken English at a relatively fast pace, the pictorial element helps students see what is being made and allows them to make connections between audio and visual, which in turn builds English vocabulary. As well, if the videos are added to YouTube, students can add subtitles in their native language, again aiding in the association of words and pictures. Since the video is short in content, it is important to consider the language being used, in order to fit the specific students based on their age and comprehension levels.
Psychographic/Behavioural
Elementary and middle school students often thrive through sensory rich learning that uses experimentation at a low risk level. Unlike the more traditional lecture style learning where many students quickly become disengaged, active participation in experiments leads to curiosity and excitement about learning and wanting to be at school. With an increasing number of cellphones globally, middle school students are consuming progressively more content through social media apps, such as Instagram and TikTok, which focus almost exclusively on short form content. This trend has contributed to decreasing attention spans of many learners. By presenting STEAM projects through engaging videos, students become interested in what they are learning.
POV statement
Transforming traditional science lessons into short, interactive experiments, such as exploring gravity, capillary action in plants, and contact and non-contact forces through quick, step-by-step videos, students are more likely to stay focused and more engaged in their learning and become better connected with scientific ideas.
Learning objectives (these ideas were taken directly from the BC elementary and middle school curricula)
Grade 2
- Chemical ways of changing materials
- Types of forces
- Contact and Non-contact
- Observe and describe changes that occur when mixing substances (food colouring, water, flower)
- Questioning and predicting: demonstrate curiosity and a sense of wonder about the world
- Observe objects and events in familiar contexts
- Ask questions about familiar objects and events
- Make simple predictions about familiar objects and events
Grade 5
- Properties of simple machines and their force effects
- Power: the rate at which energy is transferred
- Making predictions
- Observation skills
Grade 6
- Effects of balanced and unbalanced forces in daily physical activities
- Unbalanced forces are unequal; one force is larger (e.g., race cars on different ramps, mousetrap cars, rockets)
- Newton’s three laws of motion
- First law: objects will stay stopped or in constant motion until acted upon by an outside force
- Second law: only an unbalanced force causes acceleration
- Third law: Every force has an equal and opposite reaction force
- Force of gravity
- On Earth, gravity pulls objects toward the centre of the planet (e.g., falling objects, egg drop)
- Scientific Method: Question, hypothesis, prediction, experiment, analysis, conclusion
Grade 7
- Chemical changes
- When atoms rearrange into new products accompanied by an energy change (e.g., rusting, the reaction of vinegar and baking soda, etc.)
Sub-learning objectives
- Practice following step-by-step instructions to complete a task
- Promoting a love for science
- Understand important scientific vocabulary related to forces and chemical changes
___________________________________________________________________________
Plan (Ideate, Sketch, Elaborate)
Ideation
As we discussed our project, we went through many phases of decision making. First, we had to decide what aspect of information we wanted to address. We did this based on what was interesting to us. We are all interested in educating young individuals in a fun and engaging way and making learning exciting. This brought us to the idea that we should look at fun experiments that we used to do that had a positive impact on our learning in elementary and middle school. We brainstormed about English (or language arts) projects, but found the ideas we came up with (how to write a compelling essay, proper sentence structure, and punctuation placement) didn’t spark inspiration in us and could potentially be better taught through other forms of media. Next, we assessed our experiences with science projects. This brought back strong memories of exciting science experiments we had witnessed. As young students, perhaps the most exciting day of the whole year was when we got to watch a baking soda and vinegar volcano explode. Clearly these experiments had lasting impacts on us and helped us retain the information we were taught. We decided we wanted to try to encapsulate that excitement into videos as an equally effective tool for learning.
The most fruitful idea we could come up with that would increase the interest in an informational video was to add a “how-to” component. A follow along tutorial that leads to an exciting experiment would connect the students to the content in a hands-on scenario therefore increasing memory retention and learning. We looked at the BC curriculum and picked out three separate experiments that detailed different aspects of STEAM learning and created videos that contained context information and real life experience through the form of an experiment.
The goal of these prototypes is to test the level of engagement the storylines generate without the aid of the visuals. We are hoping for peer reviewers to be able to see the impression the videos will have and the lasting impact of the information presented in this way without the distraction of the videos. We are also hoping that the prototype will allow peer reviewers to assess if they retained the information or if the storylines need to be more detailed, less distracting, or more exciting.
Promising prototype
Other promising prototypes we attempted included simple educational videos regarding contact and non-contact forces, gravity, and capillary action. While these were good ideas and we liked our topics, they seemed to lack the excitement we were hoping to incorporate. To make our videos more exciting, we decided to create how-to and educational demonstration videos to help show our topics in a fun and engaging way.
Storyboard
Isaac:
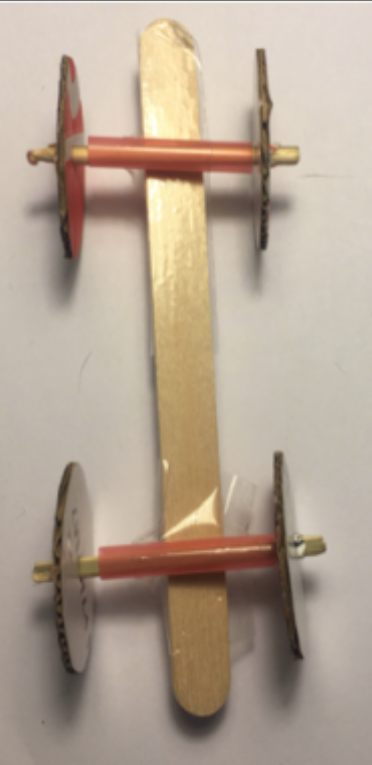
Concept: Contact vs. non-forces. This video will be used to show how to build a basic toy car and a few examples of how it can be moved using contact and non-contact forces.
1. Visual: Start with a brief rundown of the different materials needed to make the cars.
Audio: For this STEAM project we will need 1 large popsicle stick, 1 straw, 2 toothpicks, 4 cardboard wheels, 2 pieces of tape and scissors.
2. Visual: Putting the materials off to the side and starting to cut the straw.
Audio: Now that we have all of our materials, we will start by cutting our straw into two 4cm pieces.
3. Visual: The straws will be taped to one side of the popsicle stick.
Audio: We are now going to grab our tape and popsicle stick. Place the small pieces of straw on either end of the straw and use the tape to secure them.
4. Visual: Place toothpicks through the straw
Audio: Next, grab your two toothpicks and place one through each of the pieces of straw.
5. Visual: Attach two wheels to each of the toothpicks
Audio: Lastly, get each of the four wheels and attach two wheels to either side of the toothpicks.
6. Visual: Car rolling
Audio: Car complete!
7. Visual: Car moving by pushing it with a stick.
Audio: As we know from class, a contact force happens when two objects are in direct physical contact with each other. For example, pushing our car with a stick.
8. Visual: Car moving with the air from a balloon.
Audio: As we also know from class, a non-contact force happens when an object moves without direct physical contact. For example, pushing a car with the air from a balloon.
___________________________________________________________________________
Emily:
Concept: Gravity. This video uses hands-on learning paired with basic scientific explanations of gravity to engage students in fun learning and make the lesson memorable.
- Visual: A bird’s eye view of the Earth from space zooms in to a person standing in a field (or anywhere).
Script: Have you ever wondered how even though our Earth is a big, round rock floating through space we always seem to find ourselves standing upright?
- Visual: Big bold word ‘gravity’ booms on top of the image.
Script: Well that’s thanks to something called Gravity.
- Visual: White board slides into screen and the word gravity and its definition scrawl onto the board in simple, black, easy to read, letters.
Script: So what is gravity? Gravity is the force that draws objects to the center of the Earth! citation
- Visual: Show a person on either side of the bird’s eye view globe standing up right.
Script: It doesn’t matter where you are in the world, when you stand up, your feet will always be pointing toward the center of the Earth – that means gravity is working!
- Visual: a single tree with a single apple on it with no detail in the background except for the blue sky to contrast the tree. Focus on the apple hanging on the tree, starts wiggling, pauses with narration, then falls to the ground.
Script: That might sound complicated… Let’s try something a little easier. When an apple gets old and it is its time to fall off the tree, does it fall up to the sky or down toward the earth? (Pause to let the audience think) That’s right it falls down!
- Visual: White board scrawling the list as the narrator is saying the items.
Script: So let’s do something fun to make sure that gravity is working today and that no matter the direction something is initially tossed, it will always end up falling down to the ground. First, we need an apple, then some tape, some string, and a plastic bag.
- Visual: either animated or real video footage: Focus shot that is not much wider than the hands and materials with a plain background: laying out the plastic bag and cutting it into a square. Putting holes in the four corners
Script: First, we need to cut our plastic bag down to a square shape that is about 10 inches along each side. Then, we put a hole in each corner for the strings to go through.
- Visual: tying the rope through each hole in the bag and then taping around the hole.
Script: Our next step is to loop the string through the holes in the plastic bag and knot it. You may need to reinforce the bag at the hole sites, you can do this by taping around where the rope has been tied through the hole.
- Visual: Grabbing the tape. Spreading the ropes out around the apple, making a point to emphasize the equal space between each. Secure each piece of rope with a small piece of tape.
Script: Once we’ve successfully created our parachute, we need to attach it to our apple! Let’s get the tape out. Position the other ends of the rope at four equally distant spots around the apple and secure them with tape.
**All following scenes that include a kid demonstrating the action take place in a simple landscape: grey ground without any details, blue sky with no clouds, birds or sun. The kid is dressed in blue pants and a red top and has basic features. The kid is the same throughout the video.
- Visual: holding up the apple with its parachute all attached and rotating so the audience can see all sides of the project.
Script: Alright, we’ve got our finished product ready to test the force of gravity.
- Visual: show a kid holding the apple parachute in front of them and just simply letting it go. Zoom in on the apple on the ground when the narrator says “ground”.
Script: Our first test is basic. Simply hold the apple in front of you and let go! Which way did it go? Did it end up on the ground or high in the sky? To the ground!
- Visual: kid holding apple in front of them tosses it to their right and it eventually tapers and falls to the ground. Zoom in on the apple on the ground when the narrator says “the ground”. * could insert an image when the narrator is talking about it flying around the earth: birds eye view of the earth with the apple disproportionately large and flying around the world *
Script: Okay let’s try something different here. What if we threw the apple to the right of us? Would it continue to fly around the earth? Let’s see… to the ground…again!
- Visual: Kid holding apple in front then gently tossing it above their head. Freeze the apple in the air when the narrator asks if it will fly up or fall down. Unfreeze and watch the apple fall down. Zoom in on the apple on the ground when the narrator says “the ground”.
Script: Alright, our final test of gravity is to hold the apple in front of you and toss it up above your head. What about now? Did it fall to the ground or continue flying up up up and away? Back down again to the ground!
- Visual: back to the white board using the same font and layout as before. Words saying “no matter: High, fast, hard. ALWAYS down.” words appearing on screen as the narrator is saying them.
Script: No matter how high, what direction, and how hard you throw the apple, it will eventually run out of speed and gravity will become strong enough to pull it back down again
- Visual: Back to the birds eye view of the Earth and in the dark space around the Earth the question “what other things get pulled to the center of the Earth?” written in bright lettering.
Script: Now that we know gravity will always pull objects to the center of the Earth, can you come up with some ideas of other objects it pulls to the center of the Earth? I’ll give you some hints…
- Visual: First show the ocean then a waterfall. Show a plant with vines falling toward the ground. Show the back of two people’s heads, one with short hair and one with long hair.
Script: Think about the ocean, or waterfalls. Maybe think about plants with vines and which directions their vines usually grow. What about your hair? How does it sit on your head?
- Visual: Go back to the previous image used when the definition of gravity was introduced. Show clips of the apple being thrown up and to the side at the same time the narrator is mentioning those things. Show the apple sitting on the ground.
Script: So, in conclusion, today we learned that gravity is the force that pulls all things to the center of the Earth. We tested it by trying to throw the apple to space or all the way around the world, but the apple always ended up on the ground.
- Visual: Image of the world spinning. Then, when the narrator says look around you, show things like skydiving, leaves falling, and people sitting in chairs.
Script: Gravity is in action all day every day and works on all things that are on earth. Without it, nothing would exist! Look around you and check out the ways that gravity is acting on the world. You’ll be amazed.
- Visual: Big block letters spelling out “gravity” in a dark font on a bright background. Then an apple tosses up from the bottom of the screen, arches up to the top then falls and lands on top of the ‘i’ in gravity.
Script: And always remember, what goes up, must come down!
__________________________________________________________________________________
Hanna:
Concept: How plants absorb water through their stems (Capillary action)
Explanation: For my video, I will be doing the flower-colouring experiment to help elementary school students understand in a fun and engaging way how the food colour moves up the stem of the flower through tiny tubes called xylem tubes. Called capillary action, when water can move up, against gravity, into the petals. Changing the colour of the flower. Storyboard:
Title: How Do Flowers Drink Water?
| 1. Visual: background with text “How Do Flowers Drink Water? My Script: Have you ever wondered how plants stay alive? How does water travel all the way from the roots up to the flower petals? | 2.Visual: A small bouquet of carnations. My Script: Let’s see how flowers “drink” water by doing a simple science experiment you can try at home! | 3.Visual: Show the materials needed all laid out: carnations, cups of water, food colouring bottles, and scissors. My Script: Text on screen: Here’s what you’ll need: |
| 4.Visual: Show all the different food colouring in the cups of water: red, blue, green, and yellow. Script: Fill each cup about half full of water (be generous with food colouring for each cup). | 5. Visual: Cut the flower stems at an angle and place one into the different coloured cups of water. Script: Cutting the bottom of your flower stems at an angle helps absorb more water. The flower stem has little tubes that suck up water like sipping through a straw, carrying the colour to the petals. | 6. Visual: Time-lapse: The colour slowly creeps up the stem and into the petals (will speed this up and add music in the background). Script: Now, we wait! Over the next several hours, the petals begin to change colour. “It looks like magic when it’s sped up like this, but it’s really science!” |
| 7. Visual: Results! Showing all the different coloured flowers arranged together.Script: Each petal shows the path the coloured water took through the stem of the flower to the petal. | 8.Visual: Show a close-up of petals. (slow mo) Script: This experiment shows that even though we can’t see water move inside a plant, it’s happening all the time! This is called capillary action | 9. Optional: In case the video needs to be longer, mix the food colours.Visual: text on screen: “Try this: Mix two colours and see what happens!” Script: What do you think will happen when you mix red and blue together in the same flower? |
Principles applied
The principles applied were Dual Coding Theory, Active Processing, the Coherence Principle, Segmenting, the Modality Principle, the Personalization Principle, and the Voice Principle.
- Dual coding theory: Since our brains are broken into two parts, one for words and one for visuals, creating videos with spoken language while demonstrating a task will help students better comprehend the material.
- Active processing: Since all of the lessons give a brief about scientific content prior to the experiment. The students watching the videos have to use their prior knowledge and sort it into what they know and what they are still learning.
- Coherence principle: Since the videos are short, it is important to focus on the key concepts at hand. Remove extra words, sounds, and unnecessary images that could distract from the main ideas. This helps students stay focused and retain the key information.
- Segmenting principle: Each video, only being one minute long, is carefully broken down into small, manageable steps that still make sense of the complete process. This helps students follow along easily and understand each part before moving on.
- Modality principle: Key information is explained out loud while being demonstrated visually. Helping students understand and better remember the material. Seeing and hearing the steps together makes the lesson easier to follow.
- Personalization principle: Using friendly narration and conversational language helps students to feel more connected to the material and encourages them to stay interested in the lesson.
- Voice principle: Students better understand information when it’s spoken in a friendly human voice rather than a robotic one. This makes the content easier to follow and keeps them more engaged.
References: